In today’s digital era, audiences no longer engage with static websites alone—they crave authenticity, fresh updates, and social proof. That’s exactly where a social media wall for your website comes into play. By embedding a live stream of content from Instagram, Facebook, Twitter (X), YouTube, TikTok, and more, you can transform a regular webpage into an interactive hub that showcases your community, customers, and brand activities in real time.
Whether you’re running an e-commerce store, a personal blog, or a corporate website, learning how to add a social media wall to your website is one of the smartest ways to boost trust, engagement, and conversions. This guide will walk you step-by-step through everything—from understanding what a social wall is, to embedding it with ease, and even optimizing it for performance.
What is a Social Media Wall?
A social media wall on a website is a dynamic display that collects and showcases posts from multiple platforms in a single, customizable layout. Unlike a simple feed that shows only your brand’s posts, a wall aggregates hashtags, mentions, tagged content, and even customer reviews, turning your website into a live social hub.
For example:
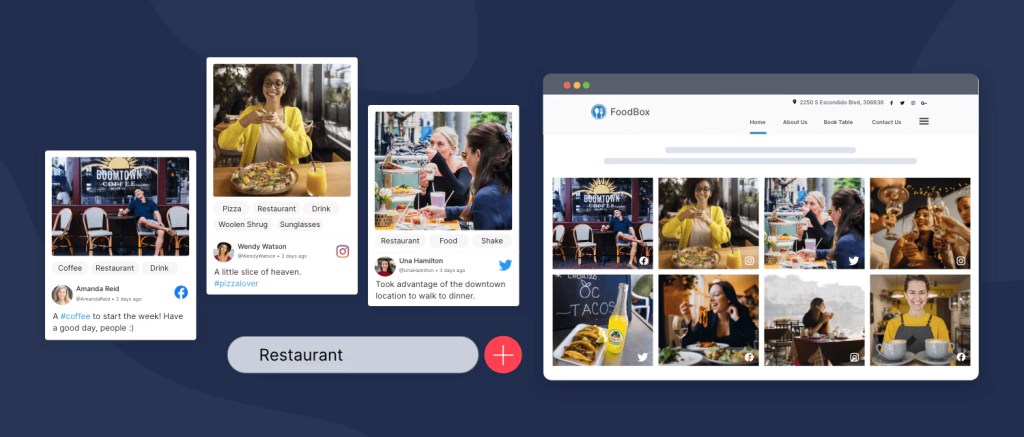
- A restaurant can display Instagram posts tagged by happy diners.
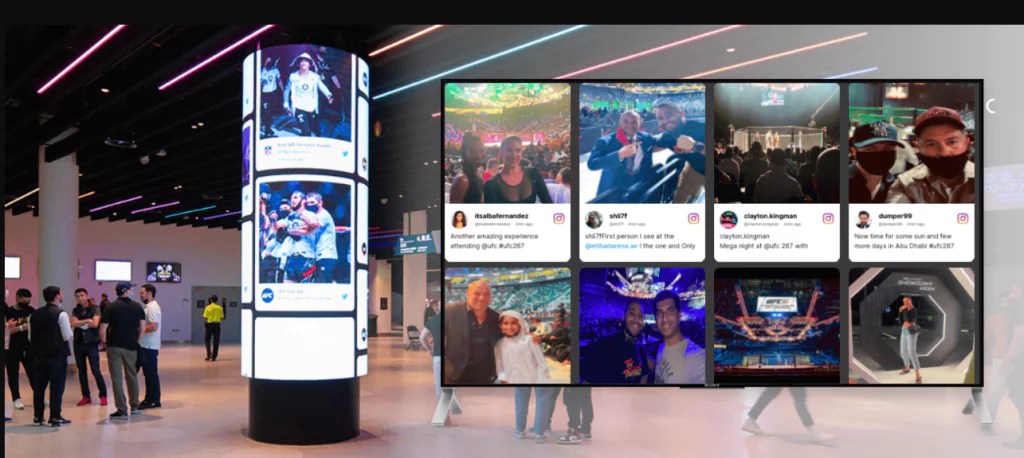
- An event website can feature live tweets and stories.
- An online shop can highlight customer reviews, unboxing videos, or UGC campaigns.
Key Benefits of Adding a Social Media Wall Website Integration
- Boost Engagement – Visitors interact more with websites that update in real time.
- Build Trust & Social Proof – Featuring customer content adds credibility.
- Support Marketing Campaigns – Showcase hashtags or event promotions seamlessly.
- Improve Conversions – Research shows that user-generated content (UGC) increases purchase confidence.
- Fresh Content Without Extra Work – Your wall automatically updates, reducing manual content uploads.
In short, a free social media wall for a website (or a paid one with advanced features) gives you a powerful way to make your website vibrant, interactive, and user-centric.
Key Considerations Before Adding a Social Media Wall
Before you jump straight into embedding a social media wall on website, it’s essential to pause and clarify a few things. A well-thought-out strategy ensures you don’t just “add” a widget but actually use it as a tool to increase engagement, strengthen branding, and drive conversions.
Defining Your Goals and Content Strategy
Every business has unique reasons to integrate a social media wall for website. Ask yourself:
- Do you want to promote an event with live user posts?
- Are you aiming to showcase customer reviews and testimonials?
- Is your priority to boost engagement with a branded hashtag campaign?
By identifying your goals first, you can decide which platforms (Instagram, Twitter, YouTube, TikTok, or even Google Reviews) are most relevant. For example:
- An e-commerce brand might highlight product reviews and influencer mentions.
- An event organizer could show real-time tweets and Instagram stories.
- A corporate website may showcase thought leadership posts from LinkedIn.
This clarity will make it easier to select the right tool and avoid clutter.
Essential Features to Look for in a Social Media Wall Tool
Not all tools are built the same. When choosing a platform to add social media wall to website, look for the following must-have features:
- Platform Compatibility – Ensure the tool supports all major platforms (Instagram, Facebook, Twitter/X, LinkedIn, TikTok, YouTube, Pinterest, etc.).
- Customization Options – Ability to edit fonts, colors, layouts (grid, carousel, masonry), and branding elements so the social media wall website integration matches your design.
- Moderation Tools – Must allow filtering, pre-approval, or auto-blocking of inappropriate/off-brand content.
- Analytics & Insights – Built-in reporting on impressions, clicks, and engagement rates.
- Mobile Responsiveness – Walls should work seamlessly across desktops, tablets, and mobiles.
- Pricing & Scalability – Some offer a free social media wall for website, but premium plans unlock advanced moderation, analytics, and unlimited feeds.
Step-by-Step Guide – How to Embed a Social Media Wall on Your Website
Adding a social media wall on a website doesn’t require advanced coding skills. Most tools make it a plug-and-play process with just a few steps. Here’s the complete guide:
Step 1: Selecting and Setting Up Your Aggregator Tool
The first step is choosing a reliable tool to create your social media wall website integration. Popular platforms include Taggbox, Social Walls, Flockler, EmbedSocial.
- Sign up for an account with your chosen provider.
- Connect your social media accounts (Instagram, Facebook, Twitter/X, TikTok, YouTube, LinkedIn, etc.).
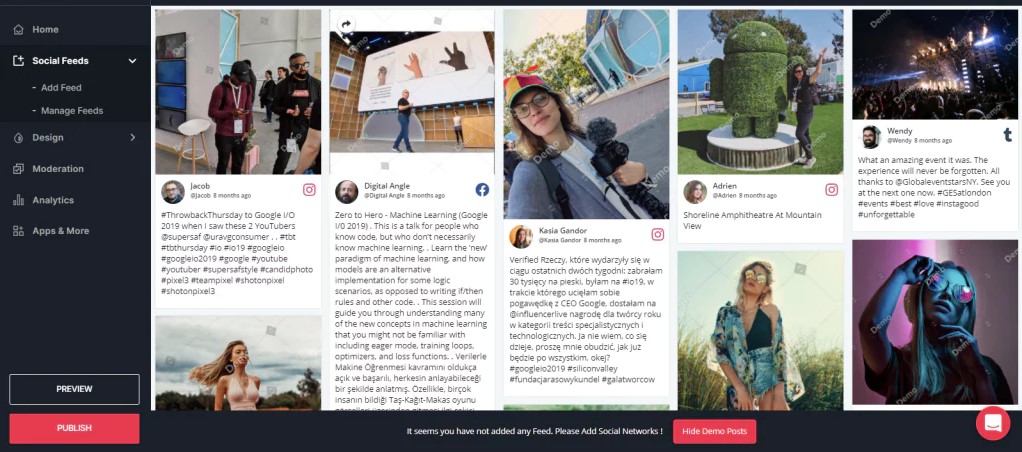
- Explore the dashboard, where you’ll see options for content sources, design, and moderation.
Step 2: Curating and Moderating Your Social Content
Not every post belongs on your website. That’s where moderation comes in:
- Choose sources: Hashtags, brand mentions, specific accounts, or page feeds.
- Enable moderation: Use filters to approve, reject, or auto-block inappropriate posts.
- Maintain relevance: Only display content that supports your campaign or brand voice.
Step 3: Customizing Your Wall’s Design and Layout
Once you’ve curated the content, it’s time to make it match your website’s branding:
- Layouts: Choose grid, carousel, slider, or masonry.
- Branding: Add your logo, adjust colors, and select fonts.
- Responsive design: Test how the wall looks on mobile, tablet, and desktop.
Remember: A well-designed social media wall for website should blend naturally with your theme and not feel like a third-party add-on.
Step 4: Generating and Embedding the Code on Your Website
Here’s the key part: making the wall live on your website. Once you’re happy with the design, your tool will generate an embed code (JavaScript or iframe).
Platform-specific instructions:
- WordPress: Add via “Custom HTML” block or use the tool’s dedicated plugin.
- Shopify: Insert the embed code in a custom HTML section of your page.
- Squarespace: Use the “Embed Block” feature and paste the code.
- HTML Websites: Paste the code directly into your site’s HTML where you want the wall to appear.
Step 5: Testing, Optimizing and Monitoring Performance
Finally, test your social media wall:
- Check responsiveness across devices (desktop, mobile, tablet).
- Monitor site speed – use lazy loading or asynchronous scripts to keep Core Web Vitals intact.
- Track analytics – measure impressions, clicks, and engagement using the wall’s built-in reporting.
- Optimize regularly – refresh content sources, update designs, and adjust placements for better visibility.
Advanced Tips for Maximizing Your Social Wall’s Effectiveness
Once you’ve successfully added a social media wall to your website, the next step is making it work harder for your brand. A social wall is not a “set it and forget it” tool—it should be strategically used and optimized for maximum results.
1. Strategic Placement for Maximum Visibility and Impact
Where you place your social media wall on a website can make or break its effectiveness.
- Homepage: Grab visitor attention right away and build trust with authentic UGC.
- Product Pages: Showcase reviews, unboxing videos, or customer stories to increase conversions.
- Event Pages: Display live social updates from hashtags or mentions to boost participation.
- Dedicated Social Hub Page: Create a “Community” or “What Our Customers Say” page for a collection of user posts.
2. Encouraging User-Generated Content (UGC) with Clear CTAs
A social wall becomes truly powerful when your visitors contribute to it. Encourage UGC with clear CTAs (calls-to-action).
- Run Hashtag Campaigns: e.g., #MyBrandLook, #TravelWithXYZ
- Offer Incentives: Discounts, shout-outs, or giveaways for users who post.
- Feature Customers Publicly: Let users know their content might be highlighted on your site.
3. Keeping Your Social Wall Fresh and Relevant
Nobody wants to see outdated posts. To ensure your wall stays engaging:
- Regularly refresh content sources (hashtags, mentions, reviews).
- Update moderation rules to filter spam or irrelevant posts.
- Leverage seasonal trends (festive campaigns, trending memes, industry events).
- Test layouts (e.g., switch from grid to carousel for better mobile UX).
4. Drive Conversions With Smart CTAs Around the Wall
Don’t just showcase social proof—turn it into action:
- Place a “Buy Now” button near customer reviews.
- Add “Register Here” next to live event posts.
- Use pop-ups or banners encouraging users to join the conversation with your hashtag.
Common Issues and Troubleshooting Your Social Media Wall
Even the best social media wall for websites can sometimes face challenges. Here’s how to fix them quickly:
1. Display or Loading Speed Problems
- Issue: The social media wall isn’t loading, or it slows down your site.
- Fix:
- Use lazy loading (loading=lazy) to delay content until it’s visible.
- Ensure the embed script loads asynchronously (<script async>).
- Optimize images and media files from your aggregator tool.
- Use lazy loading (loading=lazy) to delay content until it’s visible.
2. Responsiveness Issues on Mobile
- Issue: The wall looks great on desktop but breaks on mobile.
- Fix:
- Choose tools with responsive design layouts (grid, carousel, masonry).
- Use preview options inside the tool before embedding.
- Adjust padding/margins in your site’s CSS to fit different screens.
- Choose tools with responsive design layouts (grid, carousel, masonry).
3. Moderation and Brand Safety
- Issue: Irrelevant or inappropriate posts appear on your wall.
- Fix:
- Enable pre-approval moderation for all new posts.
- Filter by keywords, hashtags, or sentiment.
- Set up automatic blocking for offensive terms.
- Enable pre-approval moderation for all new posts.
4. Content Rights & Privacy Concerns
- Issue: Unsure if you can legally display user content.
- Fix:
- Check your aggregator tool’s UGC rights management features.
- Add a UGC disclaimer in your website’s terms.
- Ensure compliance with GDPR/CCPA if you collect user data.
- Check your aggregator tool’s UGC rights management features.
Final Thoughts
Adding a social media wall to your website isn’t just about showing off your latest posts—it’s about creating an immersive, authentic experience that connects your audience with real voices, visual proof, and up-to-date energy. Whether you’re a small business, a content creator, or a large brand, embedding a social wall turns passive browsers into engaged participants.
FAQs
Q1. Is adding a social media wall to my website free?
Yes, some tools offer a free social media wall for website with limited features. However, advanced options like multiple feeds, deep customization, and analytics usually require a paid subscription.
Q2: What platforms can I include in a social wall?
Most tools support Instagram, Facebook, Twitter (X), YouTube, TikTok, Pinterest, and LinkedIn. Some even allow adding Google Reviews, Slack, or RSS feeds depending on the provider.
Q3: Will a social media wall slow down my website?
Not if implemented correctly. Choose tools that use asynchronous scripts and lazy loading to maintain site speed and Core Web Vitals.
Q4: Can I moderate the content on my social wall?
Yes. Almost all professional tools let you approve, reject, or filter posts before they appear on your site.
Q5: What’s the difference between a social feed and a social wall?
- A social feed shows posts from a single account (like your Instagram profile).
- A social wall aggregates multiple sources—hashtags, mentions, and different platforms—into one dynamic hub.


Leave a comment